Below is the link for Sample URL supporting SmartGWT Control.

From the above URL we have taken a scenario and recorded the script in IDE and executed it using firefox
Scenario Steps
1. Click on Demo application.
2. Click Show example button.
3. Expand General office products main node.
4. Click Account Books
5. Click any one of the item in grid displayed.
6. Edit the item under Item details and save it.
Testing using Selenium
Selenium IDE:
IDE stands for Integration Development Environment which is used for record and running the scripts means it allows us to record, edit, and debug tests.
IDE Installation:
1. Install Firefox
3. When downloading from Firefox, the following window will be presented.
4. Click on [Install Now]
Configuring Selenium IDE for SmartGWT:
- For Setting up the Selenium IDE we have to download the Smartgwt 2.4 version which consists of Extension for the Selenium IDE for identifying the smartgwt components.
- Smart Client ships with a Selenium user extension Javascript file “user-extensions-ide.js” should be added to the Selenium IDE in Options--> General---> Browse the file and add to Selenium IDE.
- In order to create tests we need a selenium user extension file to run the scripts “user-extensions.js”, and we have to add this to the selenium using Options-->General--->Browse the file and add to Selenium IDE.
- There is no need to add locator manually , Selenium commands records with the SmartClient locator (scLocator)
Recorded script in Selenium IDE.

Command used:
waitForElementPresent:
This command pauses execution until an expected UI element, as defined by its HTML tag, is present on the page. And the target should be mentioned as the scLocator of the item or element which has to be displayed.

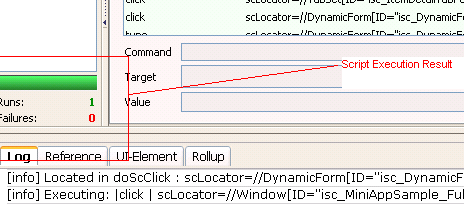
Execution Result:

Run has been completed without any failure which shows a green bar on Selenium IDE.